
While it is possible to create your own credit card process in a Ruby on Rails app, due to the PCI compliance rules, it is just safer to use something like Stripe or Braintree.
I have used Stripe before and it is very easy to set up and use. Stripe now has elements which can be used to create a custom credit card form that can be styled to look exactly like your app.
Previous to this, the dropin solutions were good but just did not look like the rest of the application.
After reading up a bit, I decided that I wanted to try out Braintree hosted fields.
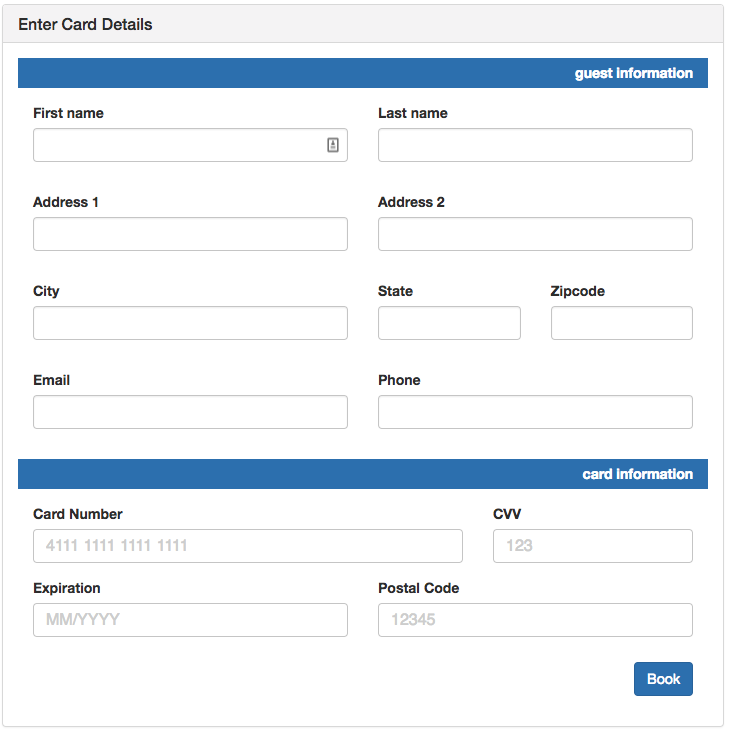
Below is the finished form that I created. I wanted to be able to get more user information at the same time as charging the credit card.
TL/DR
For the app that I made for this tutorial, it is at https://github.com/brobertsaz/rails_braintree_hosted_fields
Braintree Setup
First thing that you need to do is head on over to Braintree and sign up for sandbox account. Don’t worry, it’s free.
After you sign up you will need to copy this info:
Braintree::Configuration.environment = :sandbox
Braintree::Configuration.merchant_id = 'qwertyqwerty'
Braintree::Configuration.public_key = 'qwertyqwerty'
Braintree::Configuration.private_key = 'qwertyqwertyqwerty'
Next, create a braintree.rb file in config/initializers/ directory and add these environment variables:
Braintree::Configuration.environment = :sandbox
Braintree::Configuration.logger = Logger.new('log/braintree.log')
Braintree::Configuration.merchant_id = ENV['BRAINTREE_MERCHANT_ID']
Braintree::Configuration.public_key = ENV['BRAINTREE_PUBLIC_KEY']
Braintree::Configuration.private_key = ENV['BRAINTREE_PRIVATE_KEY']
In order to use these environment variables, we will use the Figaro gem. Add to Gemfile:
gem 'figaro'You will need to run bundle to install figaro and then bundle exec figaro install to install it. This will create a new file config/application.yml. This is where you will set your keys for Braintree.
# Braintree configuration keys
BRAINTREE_MERCHANT_ID: ''
BRAINTREE_PUBLIC_KEY: ''
BRAINTREE_PRIVATE_KEY: ''
Make sure that you add config/application.yml to your .gitignore file as this holds all of your Braintree keys.
Lastly, add the Braintree Ruby gem to your Gemfile,
gem 'braintree', '~> 2.77'and make sure that you run bundle to install it.
Note: If you are in newer version of Rails, jQuery is no longer included automatically so you will need to add
gem 'jquery-rails'to your Gemfile, and run bundle to install it.
Customers Setup
For the checkout form that I wanted to use, I needed a Customer that would be saved to the database.
rails g model CustomersNow open up the db/migrate/new-migration-file and we will add our fields
class CreateCustomers < ActiveRecord::Migration[5.1]
  def change
    create_table :customers do |t|
      t.string :first_name
      t.string :last_name
      t.string :email
      t.string :phone
      t.string :address_1
      t.string :address_2
      t.string :city
      t.string :state
      t.string :zipcode
      t.integer :braintree_customer_id
      t.datetime :last_visit
      t.timestamps null: false
    end
  end
end
We will use the braintree_customer_id so that in the future if we make a charge for that same customer, we can access the save data.
As we created the model for Customer, we can create a new customer without having to create a Customer controller. This will be done in our Checkouts controller. Let’s create that now. Create new file at app/controllers/checkouts_controller.rb and add the following:
class CheckoutsController < ApplicationController

  def new
    @customer = Customer.new
    @client_token = Braintree::ClientToken.generate
  end

  private

  def customer_params
    params.require(:customer).permit(:first_name, :last_name, :address_1, :address_2, :city, :state, :zipcode, :email, :phone)
  end
end
In the new method, we are creating a new customer that we will use in the checkout form. We also need to create a @client_token using the built in Braintree function Braintree::ClientToken.generate and we added the strong parameters which we will use later.
Now, let’s make sure that we have our routes setup correctly.
Rails.application.routes.draw do
  resources :customers
  root 'checkouts#new'
  resources :checkouts,  only: [:new, :create, :show]
end
We are going to route our app to checkouts#new which will take us to the views/checkouts/new.html.erb so lets create that file now.
There are two parts to the new view; there is the HTML markup for the form and the Javascript section that is used by Braintree to create a iframe for the credit card information.
For the sake of the demo, I just used Bootstrap CDN link in the view itself. I also used the simple_form ruby gem. Add the gem 'simple_form' to Gemfile and run bundle. Then you will need to run rails generate simple_form:install --bootstrap to install simple_form.
Form setup
HTML
For the HTML part of our form we will add the following to the views/checkouts/new.html.erb
<link href="https://maxcdn.bootstrapcdn.com/bootstrap/3.3.7/css/bootstrap.min.css" rel="stylesheet" integrity="sha384-BVYiiSIFeK1dGmJRAkycuHAHRg32OmUcww7on3RYdg4Va+PmSTsz/K68vbdEjh4u" crossorigin="anonymous">
<br><br>
<div class="col-lg-12">
  <div class="row">
    <div class="col-lg-6 col-lg-offset-3">
      <div class="panel panel-default bootstrap-basic">
        <div class="panel-heading">
          <h3 class="panel-title">Enter Card Details</h3>
        </div>
        <div class="panel-body">
          <%= simple_form_for @customer, url: {action: 'create'}, method: 'post' do |f| %>
            <div class="form-group col-md-12 bg-primary mini-header">
              <label class="control-label" for="billinginformation">guest information</label>
            </div>
            <div class="form-group col-md-6">
              <%= f.input :first_name, class: "form-control" %>
            </div>
            <div class="form-group col-md-6">
              <%= f.input :last_name, class: "form-control" %>
            </div>
            <div class="form-group col-md-6">
              <%= f.input :address_1, class: "form-control" %>
            </div>
            <div class="form-group col-md-6">
              <%= f.input :address_2, class: "form-control" %>
            </div>
            <div class="form-group col-md-6">
              <%= f.input :city, class: "form-control" %>
            </div>
            <div class="form-group col-md-3">
              <%= f.input :state, class: "form-control" %>
            </div>
            <div class="form-group col-md-3">
              <%= f.input :zipcode, class: "form-control" %>
            </div>
            <div class="form-group col-md-6">
              <%= f.input :email, class: "form-control" %>
            </div>
            <div class="form-group col-md-6">
              <%= f.input :phone, class: "form-control" %>
            </div>

            <div class="form-group col-md-12 bg-primary mini-header">
              <label class="control-label" for="billinginformation">card information</label>
            </div>
            <div class="card-wrapper"></div>
            <div class="form-group col-sm-8">
              <label for="credit-card-field">Card Number</label>
              <div id="credit-card-field" class="cc"></div>
            </div>
            <div class="form-group col-sm-4">
              <label for="security-code-field">CVV</label>
              <div id="security-code-field"></div>
            </div>
            <div class="form-group col-xs-6">
              <label for="expiration-field">Expiration</label>
              <div id="expiration-field"></div>
            </div>
            <div class="form-group col-xs-6">
              <label for="postal-code-field">Postal Code</label>
              <div id="postal-code-field"></div>
            </div>
            <div class="form-group button-buffer">
              <%= f.button :submit, "Book", class: "btn-primary" %>
            </div>
          <% end %>
        </div>
      </div>
    </div>
  </div>
</div>
Now there is a lot going on here so I will explain. We are adding in bootstrap by using the bootstrap CDN link at the top.
We then are creating a bootstrap panel with the title Enter Card Details in the panel heading and the form in the panel body.
We use <%= simple_form_for @customer, url: {action: 'create'}, method: 'post' do |f| %> to create our form action to go to the checkouts create method.
The guest information section uses all simple_form. I added each input into a form-group and added the form-control class so that we have the nice bootstrap styling.
The card information section does not use simple_form and in fact does not even have input fields. This is the credit card form that Braintree will create for us. Each of the credit card fields needs a unique id which will be used in the Javascript that we add.
Javascript
For the Javascript part of our form we will add the following to the views/checkouts/new.html.erb
<script src="https://js.braintreegateway.com/js/beta/braintree-hosted-fields-beta.16.min.js"></script>
<script id="braintree-client-token" type="application/json"><%= @client_token %></script>

<script>
var clientToken = document.getElementById('braintree-client-token').innerHTML;

braintree.setup(clientToken, 'custom', {
  id: 'new_customer',
  hostedFields: {
    styles: {
    },
    number: {
      selector: '#credit-card-field',
      placeholder: '4111 1111 1111 1111'
    },
    cvv: {
      selector: '#security-code-field',
      placeholder: '123'
    },
    expirationDate: {
      selector: '#expiration-field',
      placeholder: 'MM/YYYY'
    },
    postalCode: {
      selector: '#postal-code-field',
      placeholder: '12345'
    }
  },
});
</script>
The first line gets us the Braintree javascript that is used to create the iframe. The second line is what we use to set the client token that we created in the checkouts new method and we set this to clientToken.
For Braintree hosted fields, the format is to setup Braintree to work with the form we added above. The id is the id for the form. The hostedFields section has a styles section and then our fields section.
We tell Braintree what field to use for the number, cvv, expirationDate, and the postalCode by setting the selectors to the ids from the form. We can also use the placeholder for our form fields.
Transaction
When we submit the form it will go to the checkouts create method. When this happens, the Braintree form will create a nonce which is basically a tokenized string that contains the credit card data. This data is encrypted when it is sent to the backend and will be decrypted by Braintree on their side.
Let’s start to add the create method in controllers/checkouts_controller.rb
  def create
    amount = params["amount"] ||= 200
    nonce = params["payment_method_nonce"]
    result = Braintree::Transaction.sale(
      amount: amount,
      payment_method_nonce: nonce,
    )
  end
For the purpose of this demo, I just hardcoded the amount for the charge. For the use case that I am building this for we will get a room charge based on the selected room and apply that as the amount.
Next we get the nonce from the params["payment_method_nonce"].
To create the transaction, we simply cal Braintree::Transaction.sale with the amount and the nonce.
Now the full create method:
  def create
    amount = params["amount"] ||= 200
    nonce = params["payment_method_nonce"]
    result = Braintree::Transaction.sale(
      amount: amount,
      payment_method_nonce: nonce,
      customer: {
        first_name: customer_params[:first_name],
        last_name: customer_params[:last_name],
        email: customer_params[:email],
        phone: customer_params[:phone]
      },
      options: {
        store_in_vault: true
      }
    )

    if result.success? || result.transaction
      #  create our customer user
      @customer = Customer.create customer_params
      @customer.braintree_customer_id = result.transaction.customer_details.id
      @customer.save
      redirect_to checkout_path(result.transaction.id)
    else
      error_messages = result.errors.map { |error| "Error: #{error.code}: #{error.message}" }
      flash[:error] = error_messages
      redirect_to new_checkout_path
    end
  end
Here we added in the customer data into the Braintree::Transaction.sale call.
Then if we get a successful result back, we create the Customer in our database or we render errors.
Thanks
This is a result of several posts and examples:
https://www.sitepoint.com/integrate-braintree-payments-rails/ https://github.com/braintree/braintree_rails_example https://developers.braintreepayments.com/start/example-integrations https://developers.braintreepayments.com/guides/hosted-fields/overview/javascript/v3
Demo App
For the app that I made for this tutorial, it is at https://github.com/brobertsaz/rails_braintree_hosted_fields
Feedback
If I missed something or made any errors, please let me know so that I can get this updated.